Homemade Macarons
Macaron cookies are quite trendy around Los Angeles right now. I hadn't heard about them until living here, and even then it took about seven years until a friend introduced me to them. Because of this, I'm not quite sure when they "arrived," but I can see why they are so popular.
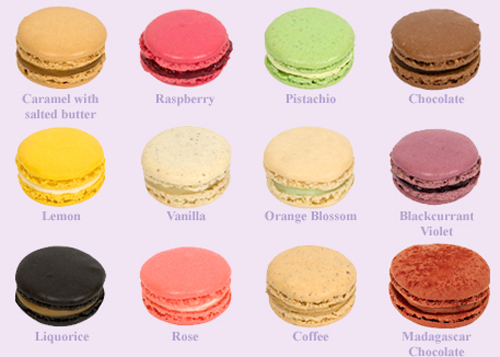
Not only are they beautifully dainty and delicate, they are also very delicious and come in a wide variety of colors and flavors. They have a light crunchy shell on the outside, and the inside, if done right, is moist and chewy. I always gravitate toward the chocolate varieties, but usually get one of another flavor to add some color to my assortment. The only problem is that they are only about 1.5 inches in diameter, but can be as expensive as $4 apiece.

Always being on the lookout for new cooking and baking ideas, I had seen some recipes for macarons floating around the internet. I was a little wary to try them, though, because along with the recipes were many horror stories and countless ways that the baking process could go wrong. All the recipes seemed to describe the technique as "hard" or "advanced." Because I enjoy cooking and baking so much, I can usually make most attempts work, but I was scared to ruin the much-loved macaron. Finally, though, I found a baking kit on Amazon, and ended up purchasing one for myself and my friend so that we could try baking them.
The kit comes with a silicone baking mat, on which are numerous little circle guides so that you can size and shape your macarons consistently. It also comes with a silicone piping bag, including 6 tips a cap, and a bag clip to prevent spillage from the top. I have only used the biggest circle tip for piping macarons, but the bag and fancier tips could be used for frosting or other baking pursuits. Also included is a recipe book, though I was disappointed that for quite a thick little book there are only a few recipes. I didn't even end up using the recipes from the book, though I have been happy with the baking mat and piping bag.

In the process of thinking about and attempting to bake macarons, I learned a few interesting things:
To make our macarons, we used this recipe. I was pleasantly surprised to find that the process was not as difficult as a lot of internet bakers make it out to be. The ingredients are few, and if you follow the procedure carefully, it seems that you can get a decent result. Aside from being a little lumpy, they worked and were delicious.
 I think most of the problem was that we were not very good at piping, and maybe we didn't mix the batter quite enough.
I tried experimenting by grinding up the almond flour a little more, but it didn't seem to make a difference. I also tried some other flavors, but I think the oven was too hot and I didn't cook them long enough.
I decided to try a second attempt at the chocolate flavor for a bake sale at work. This time, I lowered the oven temperature from 350 degrees to a little over 300. I did not grind up the almond flour, but whisked it together with the other dry ingredients before adding it to the egg whites, and I mixed the batter a little more than the previous try. I also increased the chocolate-to-cream ratio for the filling to make it a bit thicker. The small changes paid off, because the results were nearly perfect! I think my piping is getting better each time, too.

Always being on the lookout for new cooking and baking ideas, I had seen some recipes for macarons floating around the internet. I was a little wary to try them, though, because along with the recipes were many horror stories and countless ways that the baking process could go wrong. All the recipes seemed to describe the technique as "hard" or "advanced." Because I enjoy cooking and baking so much, I can usually make most attempts work, but I was scared to ruin the much-loved macaron. Finally, though, I found a baking kit on Amazon, and ended up purchasing one for myself and my friend so that we could try baking them.
The kit comes with a silicone baking mat, on which are numerous little circle guides so that you can size and shape your macarons consistently. It also comes with a silicone piping bag, including 6 tips a cap, and a bag clip to prevent spillage from the top. I have only used the biggest circle tip for piping macarons, but the bag and fancier tips could be used for frosting or other baking pursuits. Also included is a recipe book, though I was disappointed that for quite a thick little book there are only a few recipes. I didn't even end up using the recipes from the book, though I have been happy with the baking mat and piping bag.

In the process of thinking about and attempting to bake macarons, I learned a few interesting things:
- Macarons are made with almond flour/meal. I was probably naive, but had no idea that they were not wheat-based until I started looking at recipes. They can also be made with other nut flours. This means that they are gluten-free, which might attract some people and put others off, but I think that both gluten and non-gluten folks will find them very delicious. I have tried almond flour from Amazon, which worked but was a little lumpy, and from Trader Joe's which also worked and seemed to produce a smoother result. However, I am still a novice so perhaps the lumps had less to do with the flour and more to do with my technique...
 |
| $4-$5 at Trader Joe's |
- Macarons are often called French Macarons, and were said to have been brought to France for the wedding of Catherine de' Medici and the man who would later become King Henry II of France. These are also the parents of the first husband of Mary, Queen of Scots, who is supposedly a distant ancestor of my family, so that was a fun fact to find out.
 |
| King Henry II and Catherine de' Medici |
- There are two different kinds of recipes for macarons, the French kind and the Italian kind. So far, I have only tried the French variety, but people seem to be divided as to which is easier and more effective.
- While baking macarons it is important to 1. smack them on the counter a few times before baking to get out the air bubbles, and 2. let them rest for at least 10 minutes so they can form the outer shell before being put into the oven. I've seen a lot of sources that say to leave them out for hours, but ten minutes seemed to work for me.
- There is a special folding technique to master called "macaronnage." You can see an example here.
- Macarons taste better after being refrigerated for a day or two, so that the texture improves and the flavors meld.
To make our macarons, we used this recipe. I was pleasantly surprised to find that the process was not as difficult as a lot of internet bakers make it out to be. The ingredients are few, and if you follow the procedure carefully, it seems that you can get a decent result. Aside from being a little lumpy, they worked and were delicious.
I tried experimenting by grinding up the almond flour a little more, but it didn't seem to make a difference. I also tried some other flavors, but I think the oven was too hot and I didn't cook them long enough.
I decided to try a second attempt at the chocolate flavor for a bake sale at work. This time, I lowered the oven temperature from 350 degrees to a little over 300. I did not grind up the almond flour, but whisked it together with the other dry ingredients before adding it to the egg whites, and I mixed the batter a little more than the previous try. I also increased the chocolate-to-cream ratio for the filling to make it a bit thicker. The small changes paid off, because the results were nearly perfect! I think my piping is getting better each time, too.
I'm excited to try some other color and flavor combinations in the future.
.JPG)

Comments
Post a Comment